
基于Nginx, Node.js 和 Redis的Docker容器化工作流

在本文中,我将详细介绍基于Docker的示例工作流的一些概念。对于这个例子,我有一个非常简单的Node.js应用程序,用于递增存储在Redis上的计数器。我将Redis和Node应用程序独立开,因为我希望能够根据负载来扩展节点应用程序。首先,我有3个运行该应用程序的节点服务器实例。还有一个Nginx节点位于应用程序之前,用于节点实例的负载均衡。
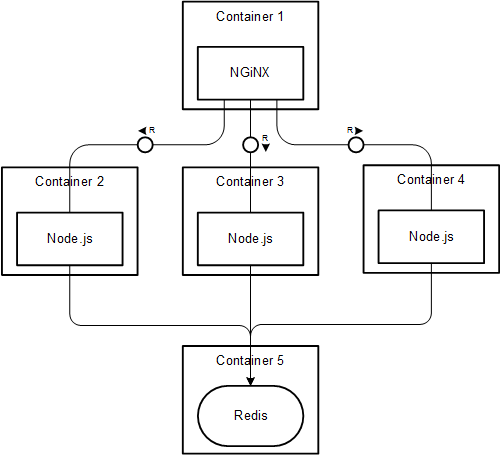
我们可以想象得到我们的容器结构:
- 1个Redis容器
- 3个Node容器
- 1个Nginx容器
我们的业务架构应该如下图所示:
我们可以使用Docker命令从头开始构建容器,但为了更容易,我们将写一个Dockerfile,它可以为我构建容器。后面我们也会用到Docker Compose来编排我们应用程序的Docker容器。
Redis 容器
让我们使用来自DockerHub的官方Redis镜像作为Redis容器。它预先安装了Redis服务器,并在默认端口6379上运行。因此,只要您确定了默认设置,就不需要配置任何设置。您可以直接从Redis映像创建并运行容器:
docker run -d --name redis -p 6379:6379 redis
你也可以从基础Ubuntu映像构建Redis映像,Dockerfile将如下所示:
# Set the base image to Ubuntu
FROM        ubuntu

# File Author / Maintainer
MAINTAINER Anand Mani Sankar

# Update the repository and install Redis Server
RUN         apt-get update && apt-get install -y redis-server

# Expose Redis port 6379
EXPOSE      6379

# Run Redis Server
ENTRYPOINT  ["/usr/bin/redis-server"]
Node.js 容器
我们先来搭建一个Node应用程序。这里就不过多解释Node.js程序编写了。这里的示例代码将用Redis 的INCR命令完成访问次数统计的功能。我使用node-redis模块和hiredis来获得更好的性能。
var express = require('express'),
    http = require('http'),
    redis = require('redis');

var app = express();

console.log(process.env.REDIS_PORT_6379_TCP_ADDR + ':' + process.env.REDIS_PORT_6379_TCP_PORT);

// APPROACH 1: Using environment variables created by Docker
// var client = redis.createClient(
//      process.env.REDIS_PORT_6379_TCP_PORT,
//      process.env.REDIS_PORT_6379_TCP_ADDR
// );

// APPROACH 2: Using host entries created by Docker in /etc/hosts (RECOMMENDED)
var client = redis.createClient('6379', 'redis');


app.get('/', function(req, res, next) {
  client.incr('counter', function(err, counter) {
    if(err) return next(err);
    res.send('This page has been viewed ' + counter + ' times!');
  });
});

http.createServer(app).listen(process.env.PORT || 8080, function() {
  console.log('Listening on port ' + (process.env.PORT || 8080));
});
你可能已经注意到用于Redis服务器的地址和端口的环境变量。这些环境变量是在linke Redis容器时由Docker定义的,这使得容器之间的通信变得很方便。
我们可以使用DockerHub上面node官方的镜像运行我们的程序,不过我们这里来一点点的不同,我们将基于Ubuntu镜像构建一个自定义镜像,然后自己在上面安装Node运行环境及其依赖。
Node的Dockerfile:
# Set the base image to Ubuntu
FROM    ubuntu:trusty

# File Author / Maintainer
MAINTAINER Anand Mani Sankar

# Install Node.js and other dependencies
RUN apt-get update && \
    apt-get -y install curl && \
    curl -sL https://deb.nodesource.com/setup | sudo bash - && \
    apt-get -y install python build-essential nodejs

# Install nodemon
RUN npm install -g nodemon

# Provides cached layer for node_modules
ADD package.json /tmp/package.json
RUN cd /tmp && npm install
RUN mkdir -p /src && cp -a /tmp/node_modules /src/

# Define working directory
WORKDIR /src
ADD . /src

# Expose port
EXPOSE  8080

# Run app using nodemon
CMD ["nodemon", "/src/index.js"]
这个Dockerfile里面做了些什么事呢?
- 从DockerHub拉取Ubuntu基础镜像
- 使用apt-get安装Node.js和依赖
- 使用npm全局安装nodemon
- 在临时目录中运行npm install并将其复制到src(用于缓存node_modules)
- 将应用程序源从主机目录复制到容器内的src
- 公开8080端口,使用nodemon运行应用程序
接下来就该用这个Dockerfile构建我们的镜像了:
docker run -d --name node -p 8080 --link redis:redis kevin/node
用自定义镜像构建一个Node容器并link到Redis容器
docker run -d --name node -p 8080 --link redis:redis kevin/node
由于我打算用3个Node节点做负载均衡,因此我必须创建3个容器 - node1,node2和node3。
这里需要注意我们已经将节点容器与redis容器链接起来了。这样就允许Node容器使用由Docker创建的主机条目或定义为环境变量的地址和端口与Redis容器进行交互。
现在我们已经有一个Node应用程序来显示在维护在Redis上访问计数器。接下来我们来看看如何使用Nginx来完成负载均衡。
NGINX 容器
Nginx的核心是它的配置,定义为一个conf文件。我定义了一个简单的Nginx配置,定义了3个服务:
worker_processes 4;

events { worker_connections 1024; }

http {

        upstream node-app {
              least_conn;
              server node1:8080 weight=10 max_fails=3 fail_timeout=30s;
              server node2:8080 weight=10 max_fails=3 fail_timeout=30s;
              server node3:8080 weight=10 max_fails=3 fail_timeout=30s;
        }

        server {
              listen 80;

              location / {
                proxy_pass http://node-app;
                proxy_http_version 1.1;
                proxy_set_header Upgrade $http_upgrade;
                proxy_set_header Connection 'upgrade';
                proxy_set_header Host $host;
                proxy_cache_bypass $http_upgrade;
              }
        }
}
我已经注册了一个node-app上游服务器,它在端口8080上的3个服务器(node1,node2和node3)之间进行负载均衡。我还指定了一个相同权重的least_conn负载平衡策略,该策略根据活动连接数每个服务器。或者,您可以使用循环法或IP哈希或基于密钥哈希的负载平衡方法。 Nginx服务器侦听端口80,并根据负载平衡策略向上游服务器节点应用程序请求代理。这里就不再过多解释Nginx配置了,有需要的可以查看官方文档。
为了构建Nginx容器,我计划使用DockerHub的官方Nginx镜像。我将使用Dockerfile来使用我自定义的nginx配置文件。
这个Dockerfile很简单 - 使用Nginx镜像作为基础镜像并将自定义nginx配置复制进去。
# Set nginx base image
FROM nginx

# File Author / Maintainer
MAINTAINER Anand Mani Sankar

# Copy custom configuration file from the current directory
COPY nginx.conf /etc/nginx/nginx.conf
构建Docker镜像:
docker build -t kevin/nginx .
用镜像运行实例化一个容器并连接到Node容器
docker run -d --name nginx -p 80:80 --link node:node kevin/nginx
最后,我们有一个Nginx服务器负载均衡3节点服务器,然后与一个节点服务器对话 - 每个服务器都在自己的容器中运行!
如果我们还是可以从ubuntu基础镜像创建一个Nginx镜像, 下面是Dockerfile:
# Set the base image to Ubuntu
FROM ubuntu

# File Author / Maintainer
MAINTAINER Anand Mani Sankar

# Install Nginx

# Add application repository URL to the default sources
# RUN echo "deb http://archive.ubuntu.com/ubuntu/ raring main universe" >> /etc/apt/sources.list

# Update the repository
RUN apt-get update

# Install necessary tools
RUN apt-get install -y nano wget dialog net-tools

# Download and Install Nginx
RUN apt-get install -y nginx

# Remove the default Nginx configuration file
RUN rm -v /etc/nginx/nginx.conf

# Copy a configuration file from the current directory
ADD nginx.conf /etc/nginx/

# Append "daemon off;" to the configuration file
RUN echo "daemon off;" >> /etc/nginx/nginx.conf

# Expose ports
EXPOSE 80

# Set the default command to execute when creating a new container
CMD service nginx start
这个Dockerfile确保Nginx不会作为守护进程运行,因为我们已经把 daemon off配置添加到配置文件了。这是必需的,因为Docker容器只运行在nginx进程保持在前台运行期间。所以如果以守护进程方式运行的nginx,容器也会立即停止。相反,将Nginx作为前台进程运行可确保容器也保持运行。官方的Nginx镜像会默认配置这个。
用Docker Compose编排容器
Compose是一个用来定义和运行复杂Docker应用的工具。
使用单独的命令构建镜像,运行和链接容器是非常繁琐的,特别是在处理多个命令时。 Docker Compose允许您在单个文件中定义多容器应用程序,并使用单个命令启动应用程序。
我已经定义了一个docker组成YAML,如下所示:
nginx:
    build: ./nginx
    links:
        - node1:node1
        - node2:node2
        - node3:node3
    ports:
        - "80:80"
node1:
    build: ./node
    links:
        - redis
    ports:
        - "8080"
node2:
    build: ./node
    links:
        - redis
    ports:
        - "8080"
node3:
    build: ./node
    links:
        - redis
    ports:
        - "8080"
redis:
    image: redis
    ports:
        - "6379"
YAML文件通过名称定义每个容器,指向用于构建的Dockerfile。此外,它还包含每个公开的容器链接和端口。由于Redis容器使用官方Redis映像,因此不需要构建。
通过一个命令,Docker Compose将构建所需的镜像,公开所需的端口,运行并链接YAML中定义的容器。所有你需要做的就是运行docker-compose up!你的5个容器应用程序已启动并正在运行。在80端口上输入你的主机URL,就可以看到计数器了!
Docker Compose的一个重要功能是动态扩展容器的功能。使用命令docker-compose scale node = 5,可以缩放为服务运行的容器数量。如果您有基于Docker的微服务架构,您可以根据负载分配要求动态扩展特定服务。理想情况下,我希望定义1节点服务并使用Docker Compose进行扩展。但我还没有想出一种动态调整Nginx配置的方法。如果您对此有任何想法,请留下评论。
但是一个重要的警告是Docker Compose尚未准备好生产。该文档建议在开发环境中使用,但尚未在生产环境中使用。但是在我以前的文章中讨论过的其他容器编排引擎,如Kubernetes。
译自 http://anandmanisankar.com/posts/docker-container-nginx-node-redis-example/